The braai has survived a century of gadgets by ignoring almost all of them. This is the honest equipment guide — the grid, the fire tools and the pot — including the page braai.co.za was once best known for: having a custom braai grid made properly.
The rooster comes first
Everything at the fire is negotiable except the grid — the rooster, to give it its proper name. It is the one piece of equipment that touches your food, and the difference between a flimsy chrome rack and a well-made rooster is the difference between fighting your braai and running it. Since 2009 this site's most-visited gear page has been about exactly this, and the advice hasn't changed: buy (or have made) the best grid you can, and it will outlive the braai it sits on.
Grid
What it is
What it's for
Flat open grid
A single flat grid, fixed rods, side handles
The workhorse — steak, tjops, wors straight on the rods. Simple, strong, easy to clean.
Toeklap-rooster (hinged sandwich grid)
Two close-meshed halves that fold shut with a sliding ring
Braaibroodjies, fish, anything soft or many — flip twenty broodjies as one. Every household needs one; no household needs two.
Adjustable-height grid
Grid on a ratchet or chain over the coals
Fire control without moving coals — raise for wors, drop for the sear. The luxury that earns its keep.
Fish grid
Long hinged grid, fish-shaped or rectangular, wide mesh
Whole snoek and other butterflied fish — support along the whole body so the flesh doesn't break.
Custom rooster
Made to your measurements by a steelworker or specialist maker
When your braai is an odd size, your crowds are big, or you're tired of wobbly retail racks. Speccing one properly is the next section.
Having a custom grid made
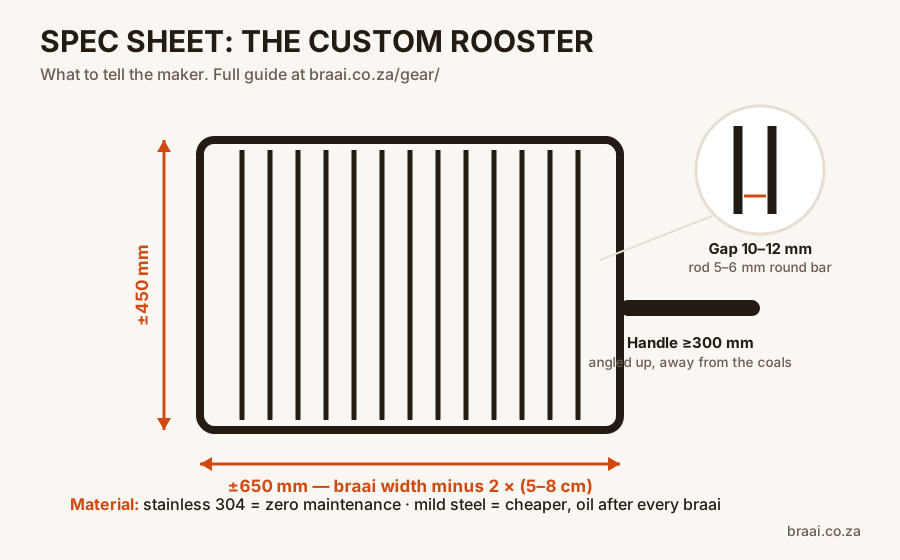
South Africa has a quiet cottage industry of steelworkers and specialist makers who will build you a rooster to measure — it's often no more expensive than the imported retail option, and immeasurably better. When you order one, these are the decisions that matter:
Size: measure the inside of your braai and keep 5–8 cm of clearance each side, so you can still move coals and get tools past the grid. For the standard 800 mm built-in braai, around 650 × 450 mm feeds six to eight comfortably.
Material:stainless steel (ask for 304 grade) never rusts and needs nothing but a brush — the right call for a grid you intend to leave your children. Mild steel is cheaper and sears beautifully, but it demands oiling after every braai and dry storage, or it goes orange on you.
Rod spacing: 10–12 mm gaps for a general grid — tight enough that wors can't dive between the rods, open enough to clean. If it's mainly for small or delicate food, ask for closer.
Rod thickness: 5–6 mm round bar holds heat and doesn't sag over a hot fire. Thin chrome rods bend the first time you load a leg of lamb.
Handles: longer than you think — 300 mm minimum, and angled slightly up, so your knuckles aren't at coal height when the fire is at its proudest.
The hinge test (for toeklap grids): open and close it in the shop. A good hinge moves smoothly and closes flat with no gap; a bad one tells you everything about the rest of the workmanship.
The custom rooster spec sheet — take this to your maker.
The braai itself
Whatever holds the fire is the braai — the tradition is gloriously unfussy about hardware. The built-in masonry braai is the South African standard: a chimney, a grid, room for a big fire, done. The freestanding drum or trolley braai does the same work on wheels and follows you to the rugby. The kettle braai earns its place the day you discover lid-on cooking — whole chicken, leg of lamb and the potato bake all come out of it looking like showing off. A gas braai is a useful outdoor stove and a perfectly honourable Tuesday appliance; our full ruling lives in the fire guide. And the three-legged pot is not a braai at all but its own religion — the potjie guide is here.
Tools that earn their place
The complete list is short. Long tongs — one pair for coals, one for meat, both longer than your forearm. A small spade or coal rake for building the two-zone fire. A wire brush for the grid. A toeklap-rooster for the broodjies. A meat thermometer for the big roasts — butterflied lamb and whole chicken are where guessing gets expensive. A bucket of sand or water within reach, for the fire, never for the meat. That's the whole kit; the 48-piece gift-box tool set can stay in the box it arrived in.
Grid care, in one paragraph
Clean it hot: straight after the meat comes off (or over the next fire's flames), let the residue carbonise, brush it off with the wire brush, and wipe the rods with a lightly oiled cloth — or the traditional half an onion, stabbed on a braai fork, which cleans, seasons and smells like a promise. Mild steel gets a film of oil before it's stored somewhere dry; stainless just gets put away. A grid cared for this way never needs soap, and never tastes of last month's snoek.